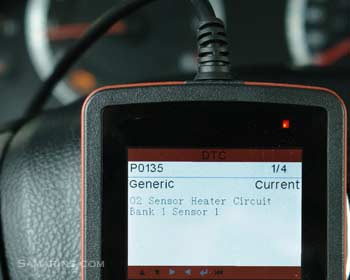
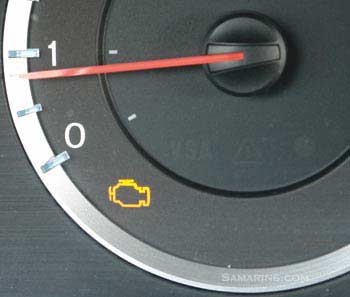
Code P0135 - Heated Oxygen Sensor Heater Circuit Malfunction (Bank1 Sensor1)
Updated: January 19, 2019
The air/fuel ratio (A/F) sensor also known as a front oxygen sensor (Bank 1 Sensor1) is installed in the exhaust before the catalytic converter. The sensor is heated by an electric heating element built inside the sensor. This is needed to quickly warm up the sensor to normal operating temperature when the car is started. The code P0135 means there is a malfunction in the A/F sensor heater circuit. Read more about the A/F sensor. • Symptoms
• Causes
• Diagnostic
• Common problems causing the code P0135
• Sample step-by-step code P0135 diagnostics
Symptoms:
In most cases, there is no symptoms other than the Check Engine Light. Often the Check engine light may come on after the vehicle has been started cold.Causes:
Common causes include:- Faulty air fuel ratio (A/F) sensor also known as front oxygen sensor or Bank 1 Sensor 1
- Corrosion or damaged terminal at the A/F sensor connector
- Damaged or shorted wiring between the sensor and the PCM or between the sensor and the fuse box.
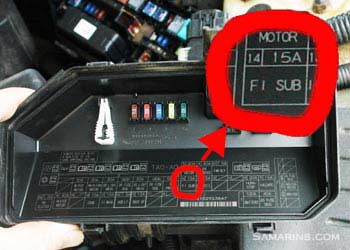
- Blown or missing fuse for the sensor heater circuit. See: How to check a fuse.
- Aftermarket or incorrect air fuel ratio sensor is installed
- Low battery charge.
How the code P0135 is diagnosed:
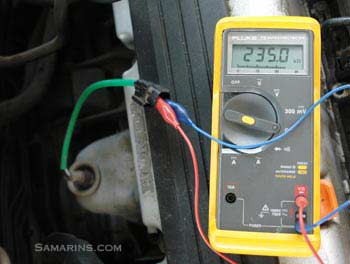
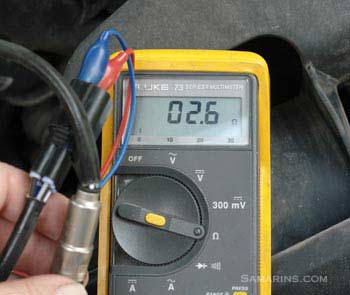
The code P0135 is a pure electric code and is easy to diagnose using a multimeter. In many cars, the battery voltage is supplied through a fuse and relay to the sensor heating element. The ground for the heating element comes from the PCM.A typical diagnostic procedure involves checking the sensor heater fuse, then the relay, then the resistance of the A/F sensor heating element. See the example of step-by-step diagnostic with photos for the code P0135 below.
The correct diagnostic procedure can be found in the service manual for your vehicle. We posted a list of websites offering paid access to service manuals for different cars at the bottom of this article.
Here are a few common problems known to cause the code P0135 in different cars:
In some Acura, Honda, Lexus and Toyota vehicles, the failed sensor heating element is known to cause this code. A failed A/F sensor (Bank 1 Sensor 1) can be confirmed by measuring the resistance of the heating element of the sensor.The resistance should be low, typically between 0.9 and 10 ohms, depending on the vehicle. Specifications for different cars can be found in the service manual. Replacing the sensor often solves the problem.
In some Chrysler vehicles, the code P0135 can be caused by incorrect replacement sensor. Different types of sensor can be used on the same car, depending on the date the car was produced. It's important to verify the correct part number of the sensor by the vehicle VIN number.
Corrosion at the oxygen sensor connector is known to cause this code in many cars. The sensor connector must be inspected for corrosion. If the corrosion is present, the terminals must be cleaned, or the connector must be replaced. For example, the Chrysler TSB for the 2010-2012 Dodge Ram, recommends repairing the sensor wiring harness with a special repair kit. In some older Mazda cars, the corroded wiring inside the fuse box can cause the code P0135. This can be confirmed by checking the 12V power and ground at the sensor.
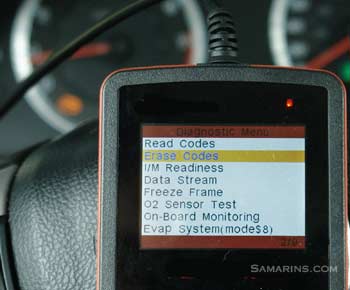
Example: Diagnosing the code P0135 step by step
 |
 |
 |
 |
 |
 |
 |
How easy is it to replace an A/F sensor? Unless it's seized, it's not very difficult, but requires a special oxygen sensor socket. Read more about A/F sensor.