Basic 12-point Car Maintenance Checklist with Photos
Updated: July 30, 2022
Your car starts and runs every day thanks to your efforts to maintain it. Here is a basic maintenance checklist, you can find the instruction for your car in the owner's manual.
1. Check the Engine Oil (level and condition)
Many cars normally consume some amount of engine oil between oil changes. Driving low on oil can cause problems. Most cars will not show any warning if the oil level is low in the engine. It's good idea to check the engine oil level with the dipstick at least once a month.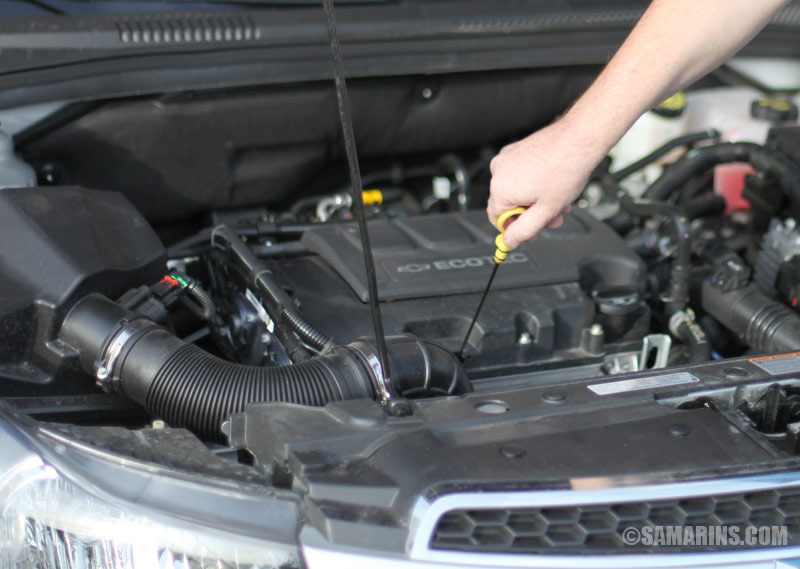 The oil dipstick has a bright handle that says "Engine Oil" The oil dipstick has a bright handle that says "Engine Oil"Open the hood and find the engine oil dipstick, it has a bright handle saying "Engine Oil". Be careful, the engine is hot. The owner's manual for your car has the instructions and the map of the engine compartment in the Maintenance Section of your car's owner's manual. |
 Careful, the dipstick might be hot Careful, the dipstick might be hot |
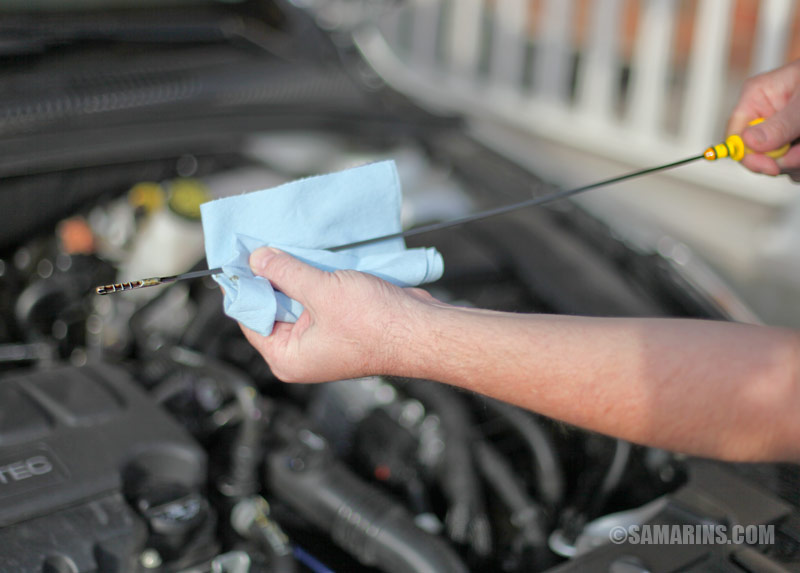
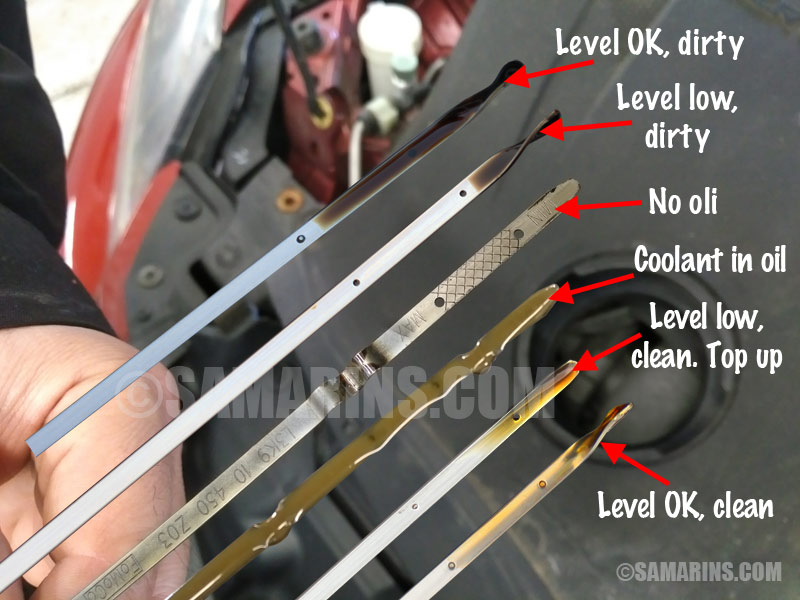 How to read the oil dipstick How to read the oil dipstickCheck the oil condition: If the oil is dirty and low, have the oil change done or at least top up the level. If it's more or less clean but low, top it up. If the level is OK and the oil is not too dirty, good job, keep driving. Of course, in a diesel or turbocharged gasoline engine, even fairly fresh oil will look dark soon after the oil change. |
How to top up engine oil
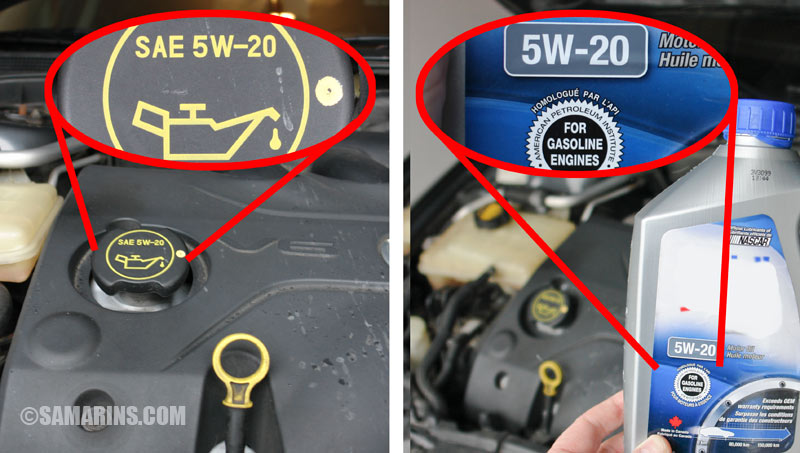 Check the oil grade on the oil filler cap Check the oil grade on the oil filler cap |
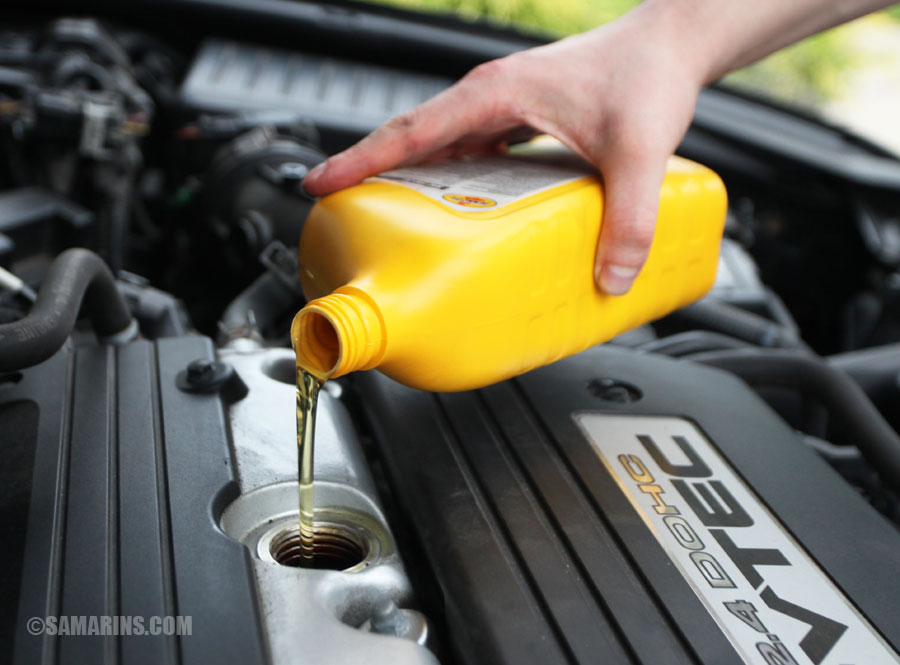 Use a funnel if needed. Wipe the spill with a towel. Use a funnel if needed. Wipe the spill with a towel.If it's still low, add some more, but don't overfill it. Don't forget to install the dipstick back and close the oil filler cap when you are done. |
2. Visually Check the Battery
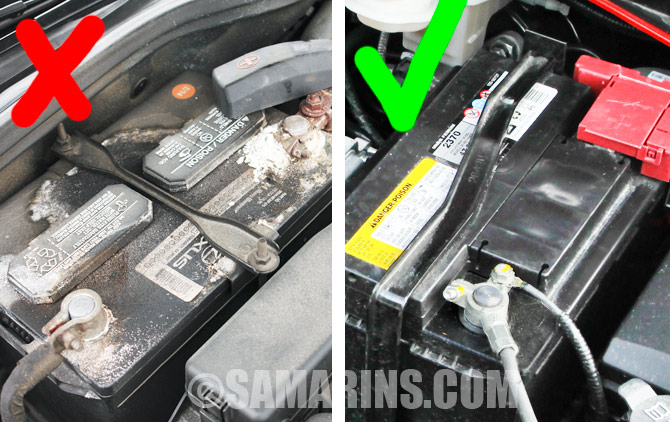 Check the battery condition visually. Check the battery condition visually.Corrosion or loose connection at the battery terminals can result in a no-start, Check Engine light, lack of electric power steering assist and many other problems. You may find tips on how to clean the battery terminals in your vehicle's owner's manual. Here are some YouTube videos on the subject. Be careful, that white flaky corrosion stuff on the battery is very acidic. Servicing battery terminals in a repair shop costs from $30 to $55. 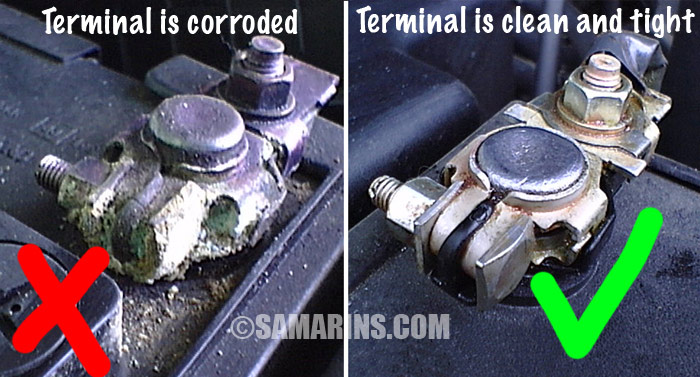 Corroded battery terminals will cause problems. Corroded battery terminals will cause problems.Your mechanic can do a battery test to check its capacity. If your battery is more than 5 years old, and you notice that it's getting weaker, it might be a good idea to just replace it. |
3. Check Engine Coolant (Antifreeze)
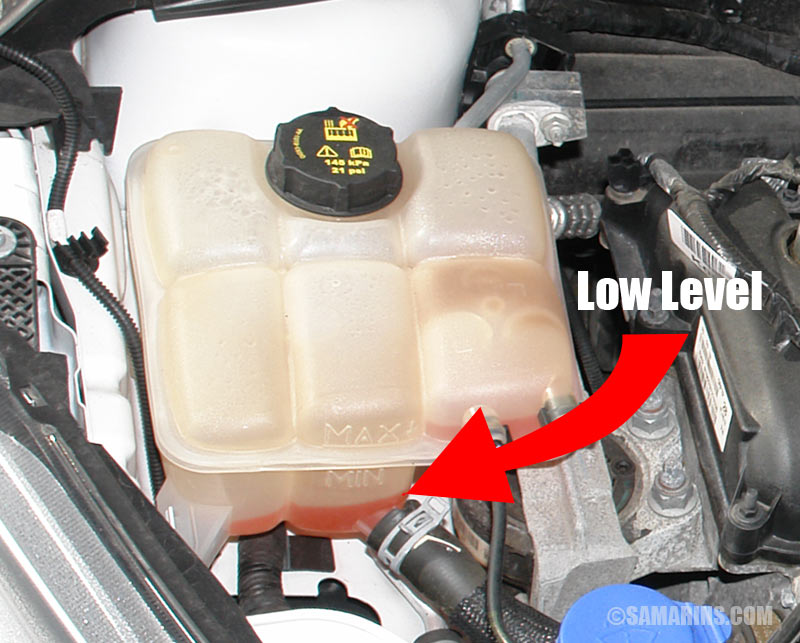 Low coolant level. Low coolant level.Visually check the engine coolant (antifreeze) level in the overflow tank. The owner's manual has instructions. The level should be between the "Low" and "Full" or "Min" and "Max" marks. Caution, don't open the radiator cap or the pressurized overflow tank cap when the engine is hot! The cooling system is under pressure when hot. Low coolant level can also cause the heater to blow cold air from the vents. Some amount of coolant normally evaporates as you drive. If the coolant level is just a bit lower, as in the photo, it needs to be topped up, using the right type of coolant. Check your owner's manual for safety precautions and the proper way to do it. If the coolant level is very low or there is a smell of coolant or signs of leaks under the hood, have the cooling system pressure tested for possible leaks. If there is a leak, it must be repaired before a lack of coolant caused the engine to overheat. Tip: whenever you take your car to the dealer for servicing, ask to top up the coolant. |
4. Check Brake Fluid Level
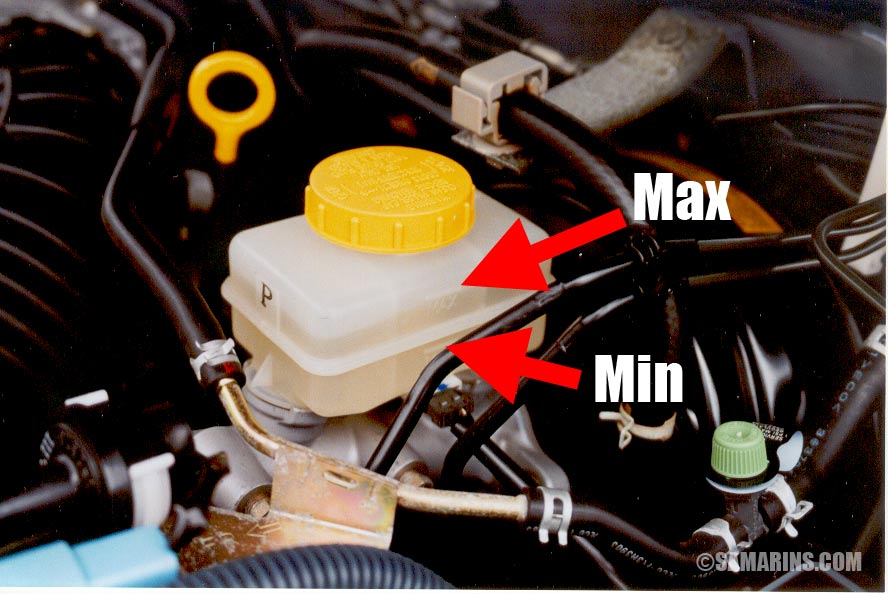 Brake fluid level. Brake fluid level.If the brake fluid level is closer to the "Min" mark or lower, it means that either your brake pads are getting low or there is a brake fluid leak. In either case, the vehicle needs to be checked out as soon as possible to keep it safe. |
5. Check Power Steering Fluid Level
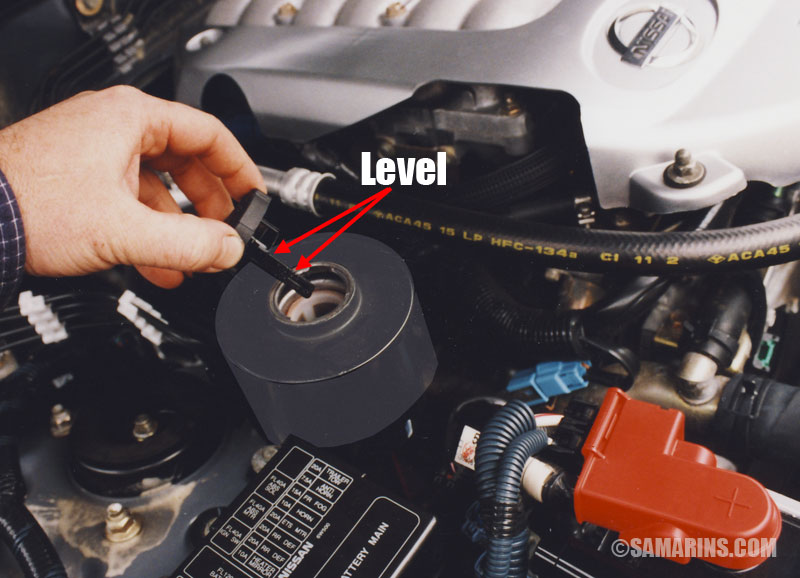
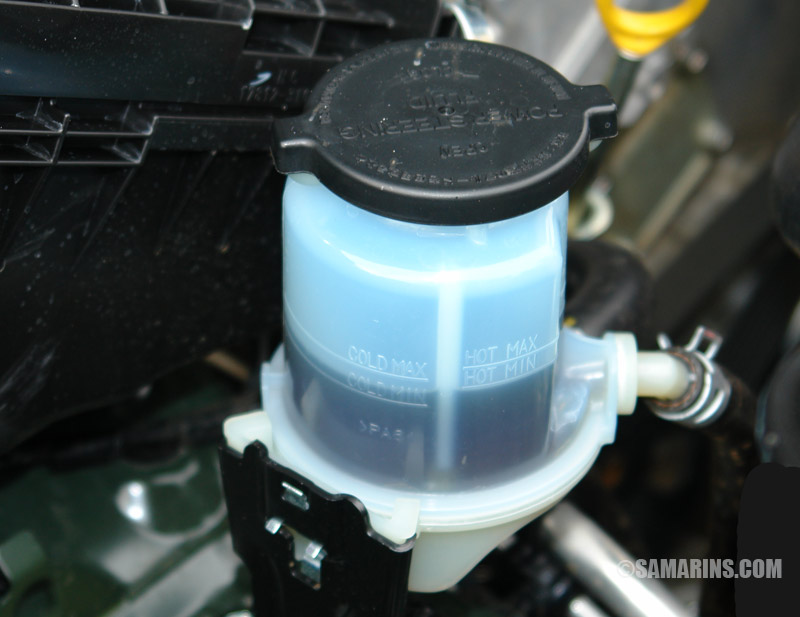 Power Steering Fluid Level. Power Steering Fluid Level.The proper level is stated on the reservoir or the cap has a dipstick that shows the level. Normally the power steering fluid stays at almost the same level if there is no leaks. If the level is low, have the vehicle checked for possible leaks. |
6. Check Automotive Transmission Fluid (if there is a Dipstick)
Many modern cars no longer have a transmission dipstick. In this case, a mechanic at your local dealership can still check your transmission fluid. If your car does have a transmission dipstick, you can find the procedure in the owners manual. It's different for different cars. This is how it's done in this Toyota and many other cars: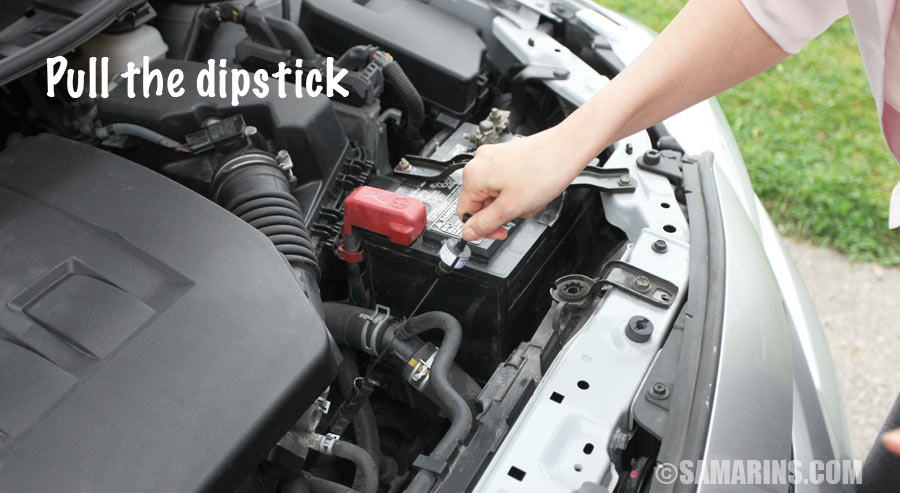 This Toyota Corolla does have a transmission dipstick This Toyota Corolla does have a transmission dipstick |
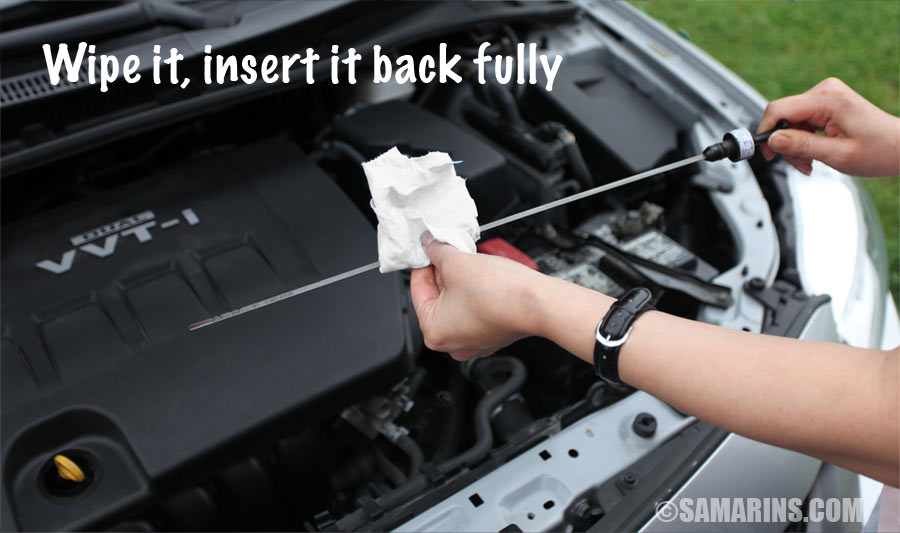 Wipe it off, using a clean lint-free towel Wipe it off, using a clean lint-free towel |
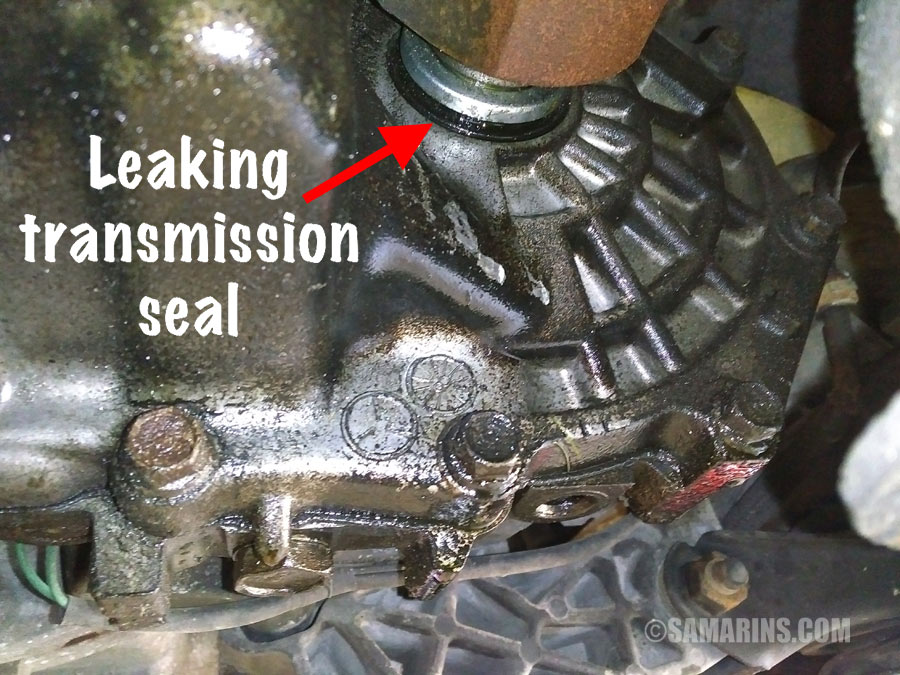
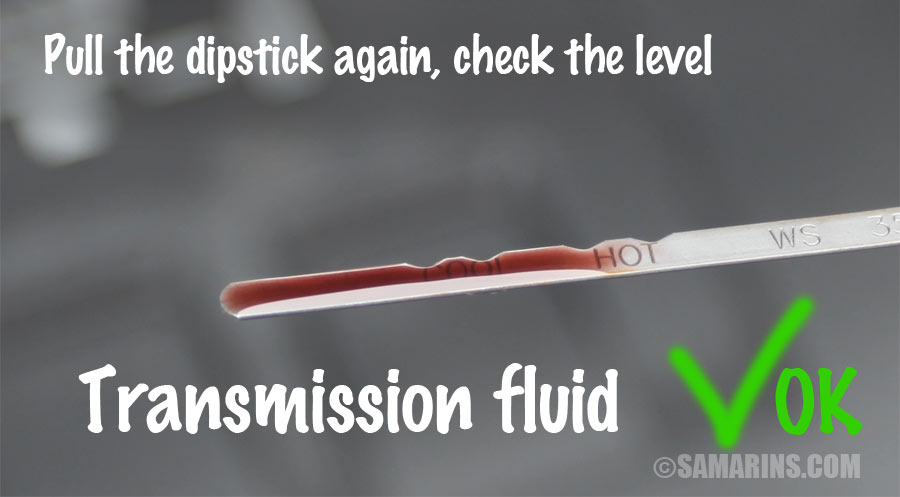 The level and fluid condition is OK The level and fluid condition is OKIf the transmission fluid level is low, suspect a leak and have it checked out. See this example of a transmission fluid leak. Check the fluid condition: if the fluid looks very dirty or has a burnt smell, see if your mechanic recommends changing it. Today's cars have very strict requirement to the transmission fluid. For this reason, we recommend visiting your dealer if you want to change your transmission fluid. |
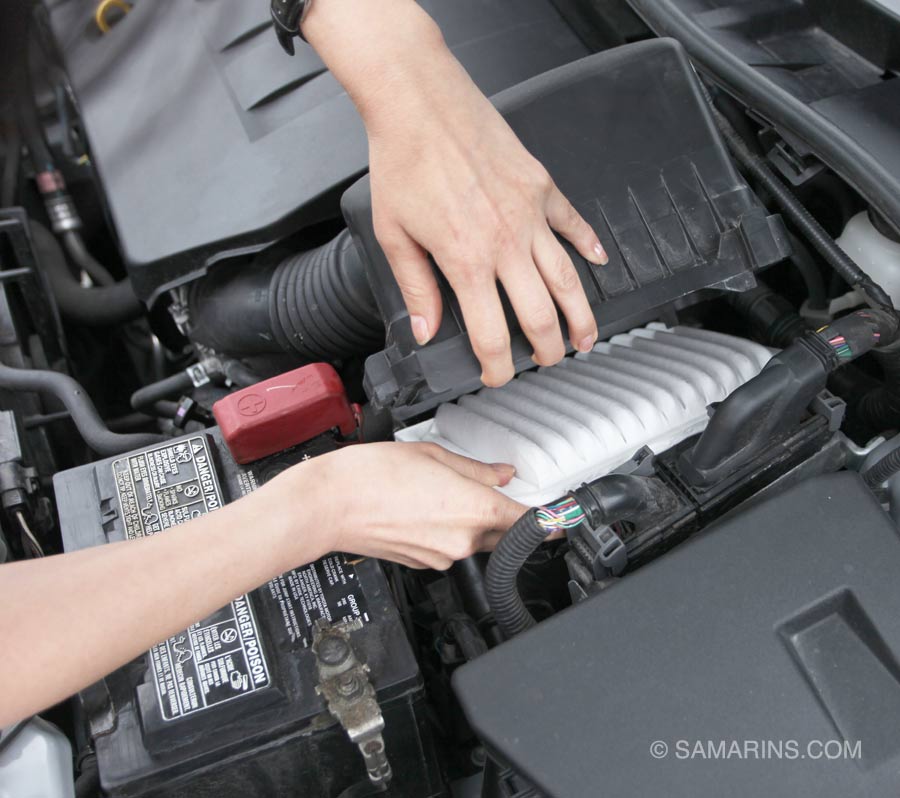
7. Check the Engine Air filter (if assessable)
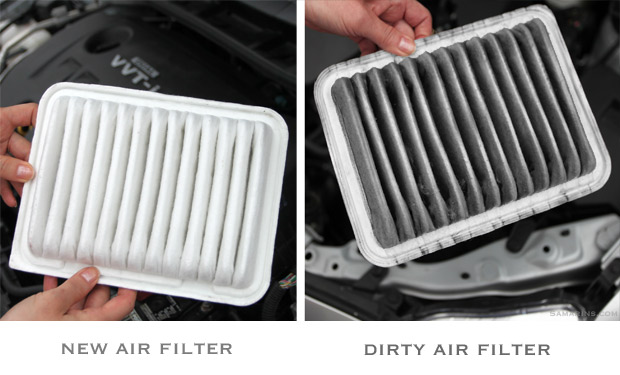 New versus dirty air filter. New versus dirty air filter.Mechanics check your air filter whenever you bring your car for an oil change. |
 Replacing an air filter in the repair shop costs $35-$50. Replacing an air filter in the repair shop costs $35-$50.When you are installing the air filter, make sure it's installed correctly. If it is not installed properly, unfiltered air entering the engine could damage the airflow sensor. |
8. Top up windshield washer fluid
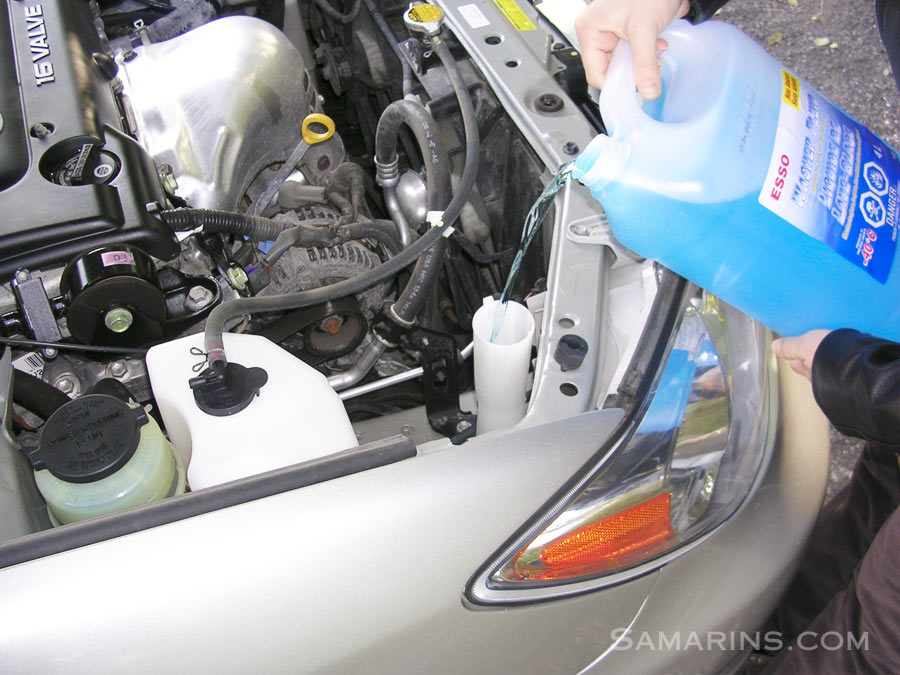 Top up your windshield washer fluid
9. Check for Visible Leaks
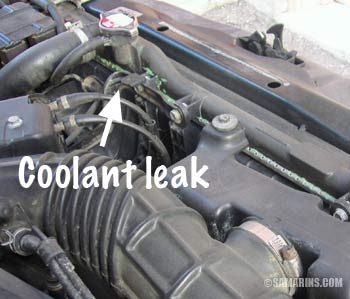 In this car, the coolant (green) was leaking out of the radiator In this car, the coolant (green) was leaking out of the radiatorCheck this photo, the owner noticed something that didn't look right under the hood, so he had it checked out. Turns out, his radiator was leaking coolant. If he hadn't repaired this problem in time, the coolant would leak out and the engine would overheat. This would cost a lot more than a new radiator. |
10. Check the Wipers
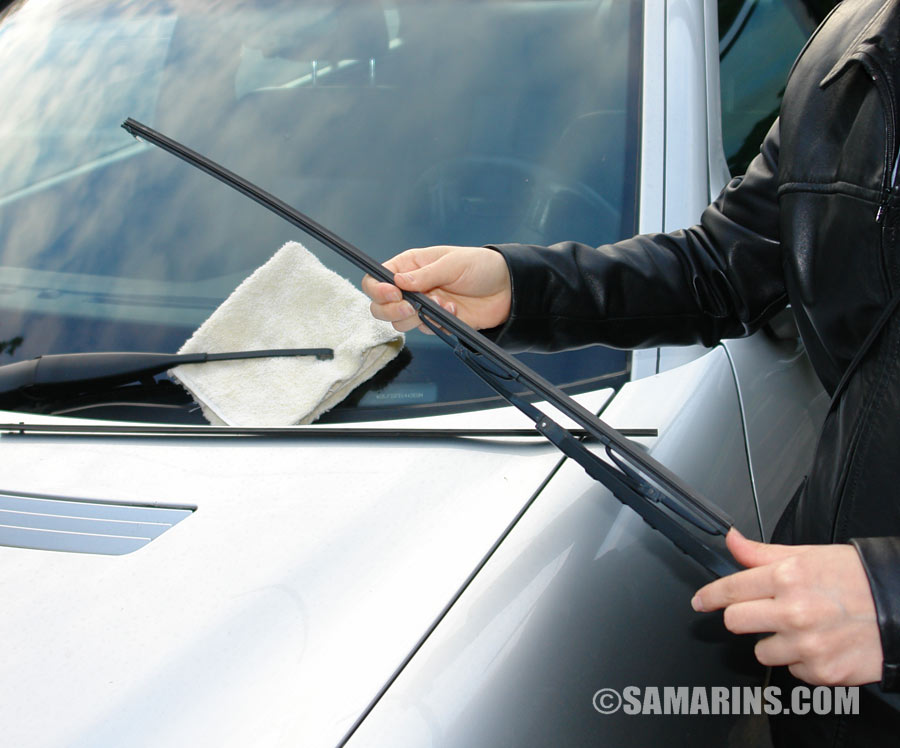 Replace the wipers if they don't clean well. Replace the wipers if they don't clean well. |
11. Check the Lights
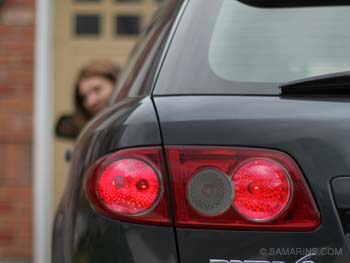 Check your lights regularly Check your lights regularly |
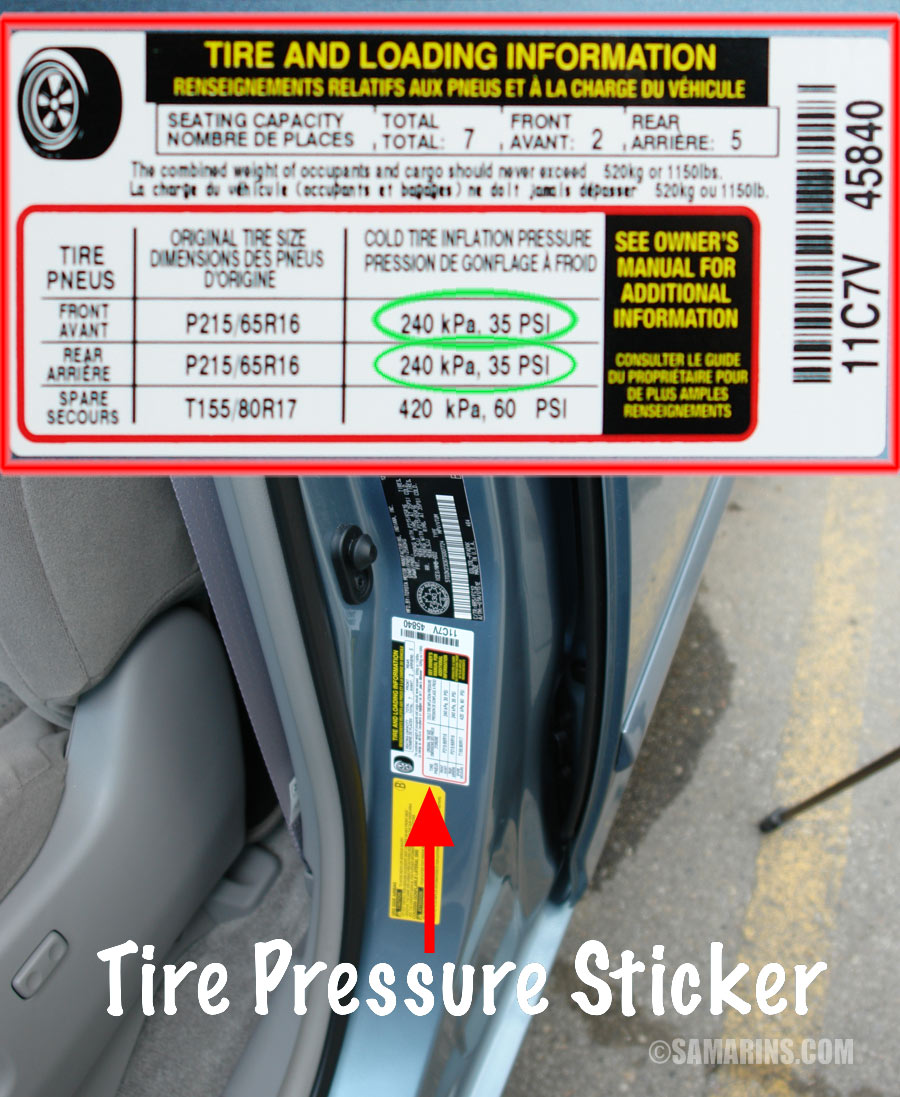
12. Check the Tires
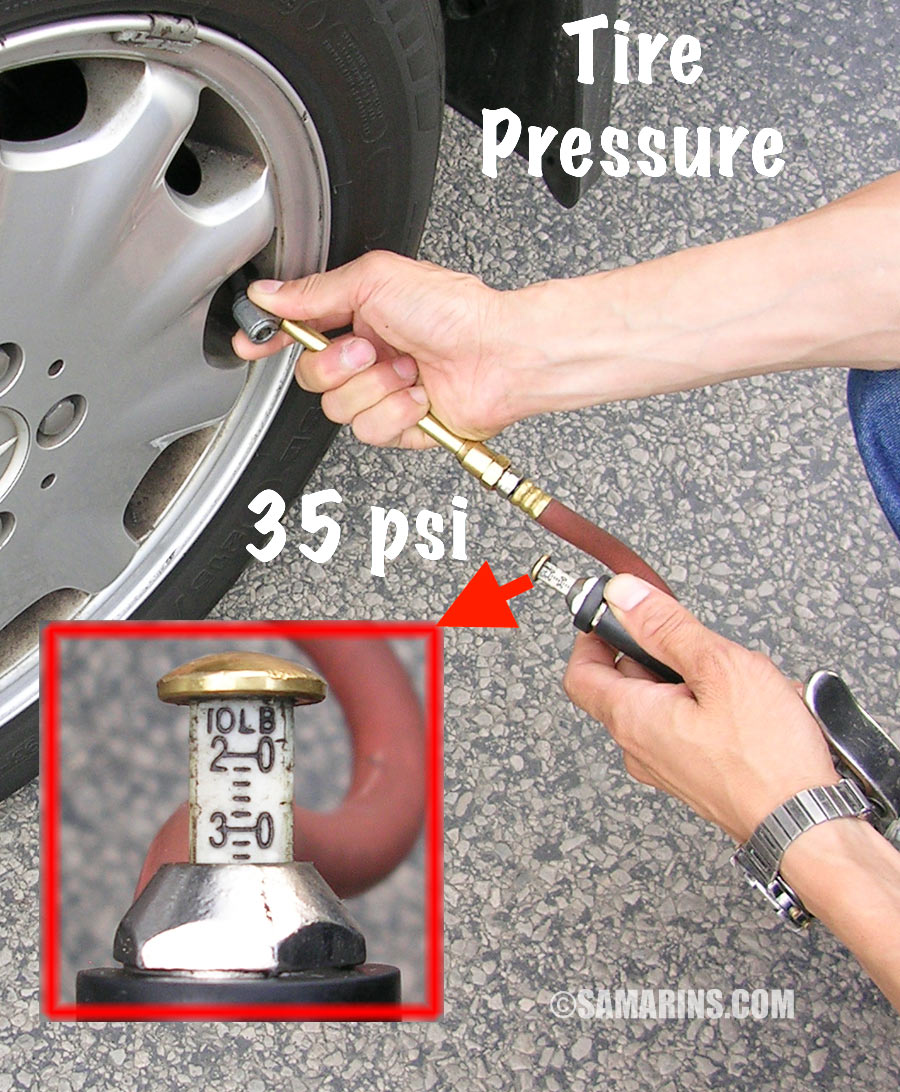 The proper tire pressure for this car is 35 psi. The proper tire pressure for this car is 35 psi.Measure tire pressure when tires are still cold. Pump or deflate to the recommended pressure. The maximum pressure listed on tires is NOT the proper pressure! |
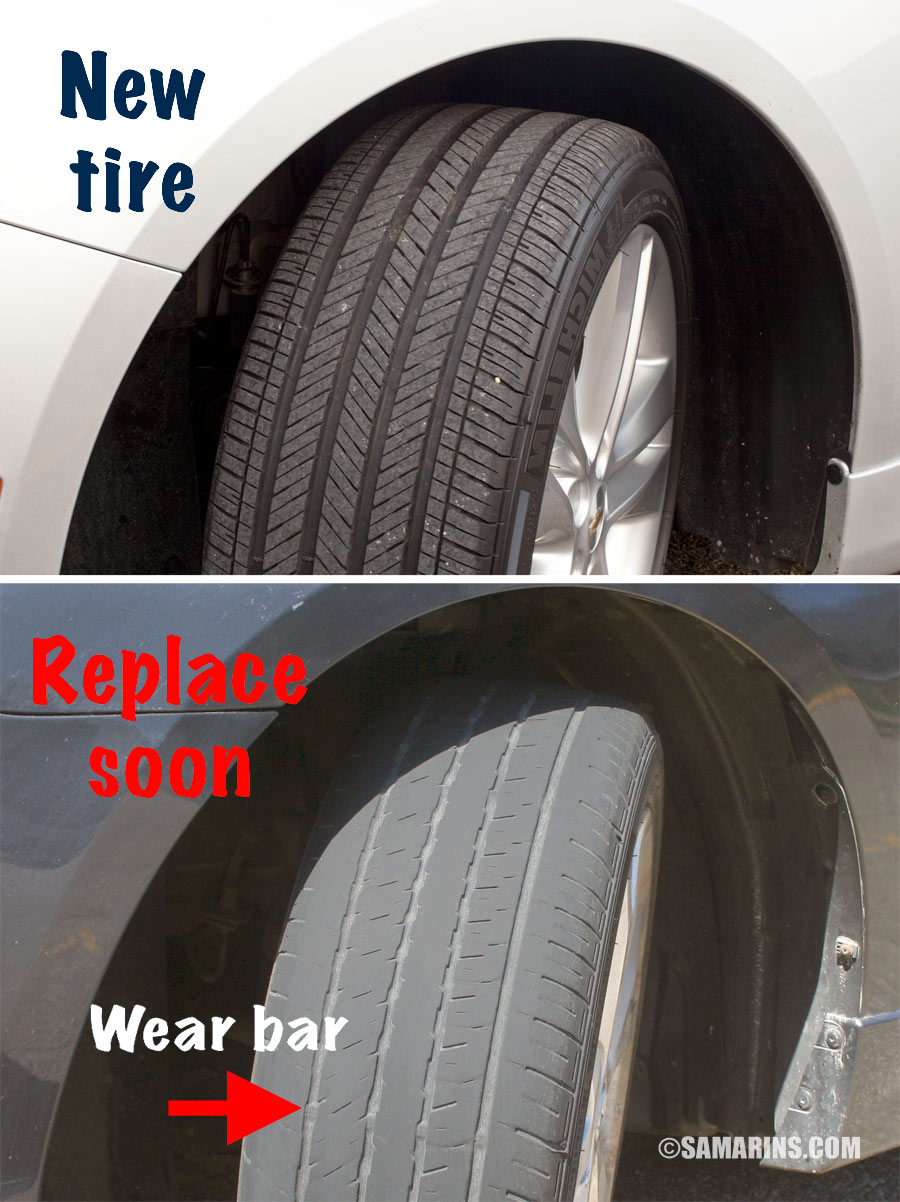
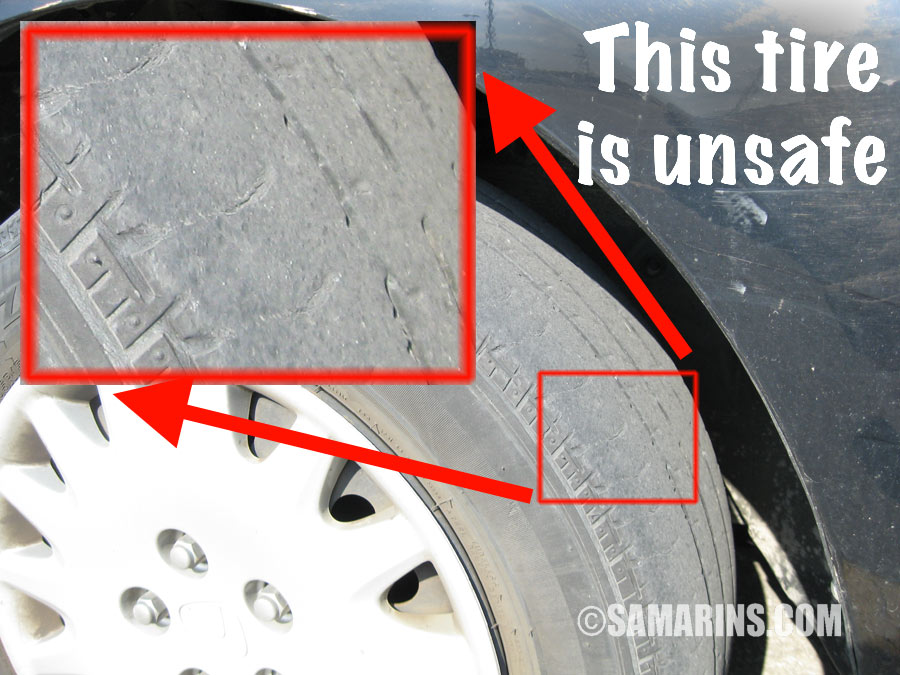 This tire is worn out below the limit of 2/32", it's unsafe to drive This tire is worn out below the limit of 2/32", it's unsafe to driveHow do you know that your tires are close to the minimum limit? Tires have wear bars (indicators) molded into the tread. See this photo of a new versus worn-out tire. You can also check the tread with a tire tread gauge. When your tire tread wears out to around 4/32-nd of an inch, it's time to start shopping for new tires. At 4/32" of the tread remaining, tires are still considered safe, but you may start noticing that your car is sliding a bit when roads are wet. |
Regular mechanical inspection
For your safety, we recommend having your car inspected regularly, at least once a year, by a trusted mechanic. We mean not just a quick visual inspection by one of the drive-through fast lube places, but a mechanic that can lift your car and check major components such as brakes, suspension, etc. This is because many components (e.g. ball joints, tie rods, sway bar links) cannot be inspected visually.Read Next:
What causes an engine to misfire
Serpentine belt: problems, signs of wear, when to replace, noises
Timing belt: when to replace, what happens if a timing belt breaks, replacement cost
Check Engine light: what to check, common problems, repair options
Car won't start: 3 common causes. Steps to diagnose
How car parts and sensors work